Mine Manhunt: Difference between revisions
From Perplex City Wiki
Jump to navigationJump to search
No edit summary |
No edit summary |
||
| Line 13: | Line 13: | ||
* At 4:01 PM BST, Kurt placed a [http://events.perplexcity.com/gateway/km444512/ link] to a "Key Communication Access" site that allowed users to access the channels [[Silburn-Griggs_IRC_chatlogs|''#kurtmod'']] and #kurtchat. | * At 4:01 PM BST, Kurt placed a [http://events.perplexcity.com/gateway/km444512/ link] to a "Key Communication Access" site that allowed users to access the channels [[Silburn-Griggs_IRC_chatlogs|''#kurtmod'']] and [[Silburn-Griggs_IRC_chatlogs|''#kurtchat'']. A short time after, Ollie opened up [[Silburn-Griggs_IRC_chatlogs|''#kurtsuggest''] for those who were fed up with spamming within #kurtchat. However, the moderators were unable to watch four channels at once and eventually focused solely on #kurtchat and #kurtmod. | ||
* | * [[Kurt]] would enter the mine several minutes later in an attempt to find [[Miranda]] | ||
==The Puzzles== | ==The Puzzles== | ||
The inside of the mine contained many puzzles, placed by apparently bored miners. Furthermore, rockfalls and other hazards made the mine extremely dangerous. | |||
===The Lift Puzzle=== | ===The Lift Puzzle=== | ||
| Line 60: | Line 61: | ||
* As participants speculated to what the symbols around Lever A corresponded to (levels, Vents, Service, water with B, C, and D referring to locations?) Kurt stated that he was beginning to feel the air becoming stuffy. His key did not show an increase in gas levels and so he speculated that the vents had been shut off. | * As participants speculated to what the symbols around Lever A corresponded to (levels, Vents, Service, water with B, C, and D referring to locations?) Kurt stated that he was beginning to feel the air becoming stuffy. His key did not show an increase in gas levels and so he speculated that the vents had been shut off. | ||
* Moving Lever A to the V position results in no change and then the lever flipping back to its original position. | * Moving Lever A to the V position results in no change and then the lever flipping back to its original position. | ||
* Moving Lever D slowly resulted in the corresponding big light turning orange halfway around the corner. | |||
* Moving Lever D to the orange position and then toggling Lever C (now identified by Kurt as a circuitbreaker) resulted in Lever D remaining flipped and the big light turned on. | |||
* [[Kurt]] speculated that Lever A was for specific systems (Vents, Lights, and Water. Everyone was still unsure of what S stood for). | |||
* Flipping Lever A to a position while Lever B was flipped resulted in a system being turned on. Thus, [[Kurt]] systematically turned on the vents, lights, and water systems. The "S" system seemed busted. Kurt and the participants speculated that it represented a busted security system (there were security cameras around). | |||
* Continuing down the leve, Kurt discovered another rockfall but was able to squeeze through. | |||
* Heeding warnings of a mysterious CH area ahead that was depicted on the map (speculated to be Chemical Hazards), Kurt found a locker room. Unfortunately it was locked. Rats. | |||
===The Plaque Puzzle=== | ===The Plaque Puzzle=== | ||
[[Image:PlaquePuzzle.jpg|thumb|right|Picture of the Plaque Puzzle uploaded by [[Kurt]]]] | |||
* The locker room was locked by a similar numeric pad as to the Control Center. | |||
* However, there was a warning that a failed password would lock down the system for an hour, which was time that Kurt could not waste. | |||
* Looking around, Kurt found a plaque which he uploaded. | |||
* Kurt mentioned that the plaque seemd to be something he had recently seen before, except more complex. | |||
* Cube Hunters attempted to correlate the image to previously seen maps, mainly the above-ground and the under-ground railways. | |||
* The user Cassandra discovered that the plaque relatively corresponded to the [[Perplex City Rail System]]. The dots with circles around them corresponded to the towns Wooster, Elmness, Stone Mills, and Treachery. The intials spelled out "WEST". | |||
* Kurt agrees that the plaque looks similar to the railway, albeit with more dots. He speculates that those locations had been closed down. | |||
* The password WEST opens up the locker room. | |||
===The Protective Suit Puzzle=== | ===The Protective Suit Puzzle=== | ||
* Inside the locker room, | |||
==The Encounter with Miranda== | ==The Encounter with Miranda== | ||
Revision as of 02:29, 22 May 2006
General
- On 21-MAY-06 Kurt gave a call out for volunteers to assist him while he was in the Silburn-Griggs Mines. link
- Selected volunteers were to become moderators in a specialized chat created by Kurt for the purpose of advising him through the mines.
- Kurt had set up his key to transcribe what he said into a specialized chatroom that everyone could observe.
- The moderators would be the only ones able to speak to Kurt. Participants could speak and offer suggestions in a different channel and the moderators would filter and relay the advice to Kurt.
- The selected moderators were: Lhall, Duckiemonster, Juxta, Cassandra, Ollie, Six, Zaiel, and Mima.
- At 3:09 PM BST, Cube Hunters received the following text message:
| "Miranda is ahead of me, about to enter the Silburn-Griggs mine. I will be there in around an hour - and will need your help then. Check out www.tpolt.com" |
|---|
- At 4:01 PM BST, Kurt placed a link to a "Key Communication Access" site that allowed users to access the channels #kurtmod and [[Silburn-Griggs_IRC_chatlogs|#kurtchat]. A short time after, Ollie opened up [[Silburn-Griggs_IRC_chatlogs|#kurtsuggest] for those who were fed up with spamming within #kurtchat. However, the moderators were unable to watch four channels at once and eventually focused solely on #kurtchat and #kurtmod.
- Kurt would enter the mine several minutes later in an attempt to find Miranda
The Puzzles
The inside of the mine contained many puzzles, placed by apparently bored miners. Furthermore, rockfalls and other hazards made the mine extremely dangerous.
The Lift Puzzle
- Kurt entered the very dark mine. The front was boarded up but provided little obstacle for Kurt to break down. He mentioned to us that he had his key had a light but it is not very good. He was able to locate a power switch which turned on the lights. An emtpy lift was located however none of the buttons worked.
- This moment marked the first puzzle found in the mine. The power button for the lift only activated when its corresponding power button was pressed on an opposing wall.
- The Cube Hunters advised using his foot or a board to press both buttons at the same time. The attempt with the foot was rubbish and so Kurt retrieved a board.
- At this point, it should be noted that Kurt's key started having connection problems. He reset the system. Upon reconnect, there was a great deal of confusion among the chat as the voice protocols and been disabled and the first person to enter had been given control of the room. Eventually, order was restored and Kurt had returned with the board.
- The board was placed on one button while Kurt pressed the other, thus simulating that there were 2 people pressing the lift buttons. Success!
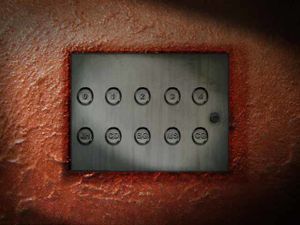
Picture of the Lift Panel uploaded by Kurt
- At this point, Kurt uploaded a picture of the lift panel for us to see. Those who were using the java client automatically had it displayed. Those who were not, had to resort to viewing an additional window (created especially for those with their own irc clients) to view the uploaded pictures.
- Random pressing of the lift panel buttons just led to "metallic clunkings" (Kurt).
- Cube Hunters were quick to relate the initials of the lower half of the buttons with the names given in the poem. Thus, the correct order to press the buttons was "MS CG CD BG JH". With the lift elevator moving, Kurt moved down to level 1.
- However, each level was blocked off with a blast door. Having no other place to go, the Cube Hunters directed Kurt back to level 1. They instructed him to crawl out of the lift elevator into a service duct which would drop him outside of the lift onto level 1. Despite some grumbling, Kurt followed these directions and ended up on level 1.
The Donkey Puzzle
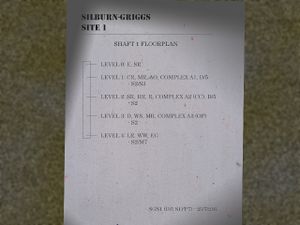
Picture of the Shaft Floorplan uploaded by Kurt
- Once on level 1, Cube Hunters directed Kurt to a mysteriouos D/S that had been the center of many a speculation. It turned out that D/S stood for D/5 and that the room was an empty cross-corridor that had been stripped of equipment. Hitting a dead end, Kurt turned back. At this point, Kurt uploaded a picture of the floorplan that he had seen in the mine.
- However, upon heading back to the lift shaft, Kurt found an electronic switch box that opened all the blast doors. Now Kurt could travel unrestricted between levels.
- Cube Hunters directed Kurt to find a Control type room that was mentioned on the website. Suggestions included CR on level 1 (Control Room?), CC on level 2 (Control Center?), and OP (Operations Post) on level 3. CR turned out to stand for Common Room. However, CC yielded the Control Center. The room was locked with an electronic alphanumeric numberpad lock. This lock was too old for Kurt's key to
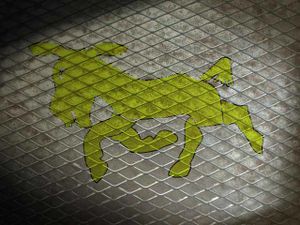
Picture of the Donkey Puzzle uploaded by Kurt
- Nearby, Kurt found a picture on the wall of a badly drawn yellow donkey, which was uploaded to the Cube Hunters.
- While people printed the picture to try and rearrange it, others offered suggestions of passwords that referenced Mythology and the Golden Hinde. Other suggested passwords included the l33t sp34k version of donkey (d0nk3y). Eventually, the user Cabbage "found a puzzle - a little white horse hidden inside an ass".
- After some explanation, fellow participants (and Kurt) realized that moving the pieces of the donkey around created a picture of a white horse.
- Horse ended up being the code that opened the Control Center.
- The Control Center was empty and filled with dust. Booting up an active console, Kurt gained access to the mine systems. The electrical output showed a significant amount of electrical activity in the southmost portion of level 1. Kurt chose to head there.
- Unfortunately, levels 1 through 3 had been blocked by (what seemed to be recent) rockslide.
- Kurt headed to level 4, which seemed "rougher ... newer" than the other levels. At this point, the lights decided to turn off, plunging Kurt into darkness.
The Morse Code Puzzle
- At this point, Kurt heard an alarm type sound coming from "a direction", which he uploaded for us. The sound seemed to be a series of alternating beeps, similar to Morse Code.
- Upon examination, Kurt said that it came from two directions.
- Cube Hunters quickly separated the sounds into two morse audio clips. One direction said "POWER", the other said "DEADEND". Kurt chose to follow in the direction of POWER.
- Participants speculated as to whether the alarm was automated or set off by Miranda. Kurt speculated it to be automated due to power failure.
- Walking down the route towards POWER, Kurt found a junction box.
The Junction Box Puzzle
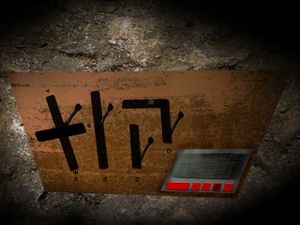
Picture of the Junction Box Puzzle uploaded by Kurt
- The Junction Box appeared to be a series of labeled levers with some corresponding lights.
- Flipping Lever D resulted in the big light flickering green and then the lever and the light returning to their original positions.
- As participants speculated to what the symbols around Lever A corresponded to (levels, Vents, Service, water with B, C, and D referring to locations?) Kurt stated that he was beginning to feel the air becoming stuffy. His key did not show an increase in gas levels and so he speculated that the vents had been shut off.
- Moving Lever A to the V position results in no change and then the lever flipping back to its original position.
- Moving Lever D slowly resulted in the corresponding big light turning orange halfway around the corner.
- Moving Lever D to the orange position and then toggling Lever C (now identified by Kurt as a circuitbreaker) resulted in Lever D remaining flipped and the big light turned on.
- Kurt speculated that Lever A was for specific systems (Vents, Lights, and Water. Everyone was still unsure of what S stood for).
- Flipping Lever A to a position while Lever B was flipped resulted in a system being turned on. Thus, Kurt systematically turned on the vents, lights, and water systems. The "S" system seemed busted. Kurt and the participants speculated that it represented a busted security system (there were security cameras around).
- Continuing down the leve, Kurt discovered another rockfall but was able to squeeze through.
- Heeding warnings of a mysterious CH area ahead that was depicted on the map (speculated to be Chemical Hazards), Kurt found a locker room. Unfortunately it was locked. Rats.
The Plaque Puzzle
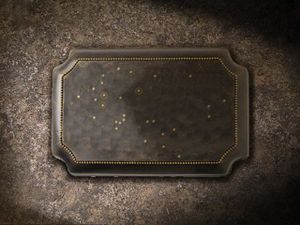
Picture of the Plaque Puzzle uploaded by Kurt
- The locker room was locked by a similar numeric pad as to the Control Center.
- However, there was a warning that a failed password would lock down the system for an hour, which was time that Kurt could not waste.
- Looking around, Kurt found a plaque which he uploaded.
- Kurt mentioned that the plaque seemd to be something he had recently seen before, except more complex.
- Cube Hunters attempted to correlate the image to previously seen maps, mainly the above-ground and the under-ground railways.
- The user Cassandra discovered that the plaque relatively corresponded to the Perplex City Rail System. The dots with circles around them corresponded to the towns Wooster, Elmness, Stone Mills, and Treachery. The intials spelled out "WEST".
- Kurt agrees that the plaque looks similar to the railway, albeit with more dots. He speculates that those locations had been closed down.
- The password WEST opens up the locker room.
The Protective Suit Puzzle
- Inside the locker room,